How to Create Beautiful Acrylic Pour Art at Home

Acrylic pour art creates swirling, marble-like patterns by thinning paint and letting gravity do the work. This guide covers everything needed to produce gallery-worthy pieces at home — from choosing the right supplies and mixing ratios to mastering basic techniques, selecting color palettes, and applying a professional finish. Whether the goal is a bold statement piece for the living room, a handmade gift, or simply a new creative outlet that doesn't require years of brush training, acrylic pouring delivers striking, one-of-a-kind results with a relatively low barrier to entry. The process is messy, unpredictable, and genuinely fun.
What supplies do you need for acrylic pouring?
The core list includes fluid acrylic paint, a pouring medium, silicone oil (optional), a clean surface to work on, and something to catch the drips. Here's the thing — you don't need a professional studio budget to get started, and many supplies hide in the hardware aisle rather than the fine-art store.
For paint, Liquitex Basics offers reliable, affordable colors that blend well without separating. Golden High Flow paints (from Golden Paints) produce intense, saturated results but cost significantly more per ounce. Many beginners start with Arteza or Apple Barrel acrylics from Blick Art Materials and upgrade to artist-grade pigments once the technique feels natural. Stick to soft body or fluid formulations; heavy-body paints require so much thinning that the color often turns dull.
A pouring medium thins paint without weakening the acrylic binder. Floetrol — a paint conditioner found at hardware stores — remains the go-to choice among hobbyists because it's inexpensive and creates excellent cell formation. GAC 800 by Golden reduces crazing (those unwanted cracks that appear as paint dries) better than Floetrol alone, though it costs more. Some experienced artists use a 50/50 blend of both to balance cost and durability.
Silicone oil — typically treadmill belt lubricant or dedicated art silicone — creates the signature "cells" that bubble up through the paint layers. A small butane torch or heat gun pops surface bubbles and manipulates the paint flow. Disposable plastic cups, wooden stir sticks, a level, and a drop cloth complete the setup. Many beginners pour inside disposable aluminum baking pans to contain the mess.
| Supply | Budget Option | Upgrade Option | Why Upgrade? |
|---|---|---|---|
| Fluid Paint | Apple Barrel, Arteza | Golden High Flow, Liquitex Soft Body | Better pigment load and color stability |
| Pouring Medium | Floetrol | GAC 800, Liquitex Pouring Medium | Less crazing and yellowing over time |
| Surface | Canvas boards | Cradeled wood panels, Ampersand Gessobord | Smoother finish, less sagging |
| Cell Maker | Treadmill silicone | Blaster Silicone Spray (used carefully) | More consistent cell size |
| Finish | Krylon Kamar Varnish | ArtResin or ProMarine Epoxy | Deep, glass-like clarity and protection |
How do you mix paint for acrylic pours?
Most beginners aim for a consistency similar to warm honey or melted ice cream. That typically means roughly one part paint to two parts pouring medium, though the exact ratio shifts depending on the brand, pigment density, and whether the paint started as fluid or heavy body.
Start by pouring the medium into a plastic cup, then add the paint. Stir slowly in a figure-eight motion — air bubbles are the enemy. (You'll torch them later, but fewer bubbles at the mixing stage means less hassle and a cleaner surface.) Some colors — especially titanium white and certain heavy-body pigments — need a touch more medium to flow evenly across the canvas. The catch? Too much pouring medium produces muddy, washed-out colors that lose their vibrancy. Too little, and the paint sits in globs or refuses to spread to the edges.
Worth noting: every paint brand behaves differently. A basic craft-store black might require three parts medium to one part paint, while a premium cadmium red could flow perfectly at a 1:1 ratio. Test small puddles on scrap cardboard or ceramic tiles before committing to a full canvas. If the mixture still feels thick after adding medium, add distilled water — only a few drops at a time. Tap water contains minerals that can interfere with paint chemistry and create unexpected texture.
Once the base colors reach the right consistency, set them aside. For a dirty pour, mix a separate cup by layering multiple colors into one container without stirring. When flipped onto the canvas, those distinct layers create the chaotic, organic patterns that make pour art so addictive to watch.
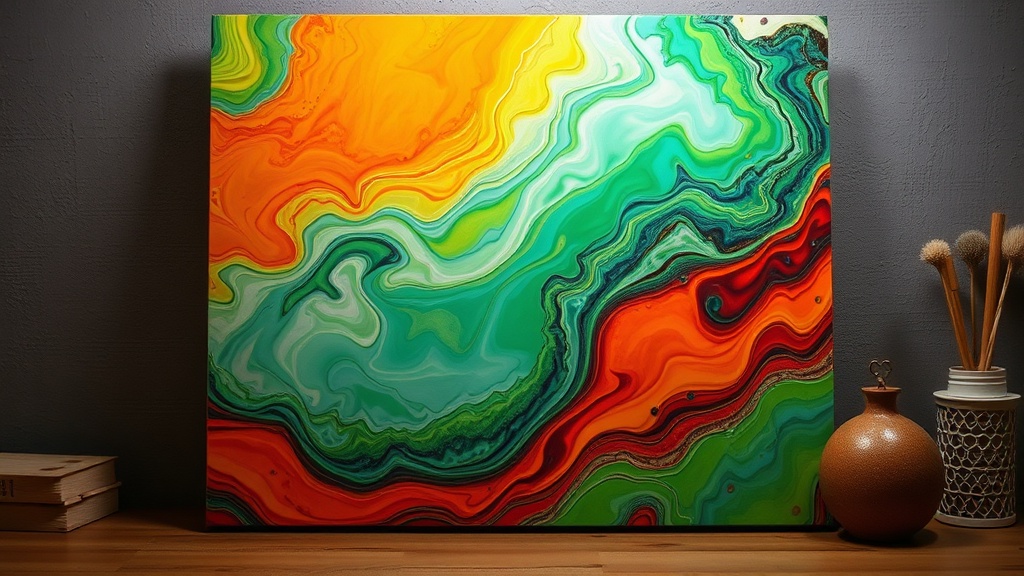
What are the best acrylic pour techniques for beginners?
The dirty pour, the swipe, and the tree-ring (or puddle) pour offer the fastest path to impressive results with minimal technical skill required. Each method produces a completely different visual effect, so trying all three helps any newcomer discover a personal style.
Dirty Pour: Layer several colors into a single cup, then flip it onto the canvas or pour it in a steady stream. Tilt the canvas slowly — very slowly — letting the paint crawl toward the edges under its own weight. This technique creates wild, unpredictable blends and tends to generate cells naturally if silicone is present somewhere in the mix. The movement matters more than precision. (Some of the best pieces come from accidental drips.)
Swipe: Pour a solid base layer — usually white or black — across the entire canvas first, then add lines or puddles of colored paint on top. Drag a wet paper towel, palette knife, or damp chamois across the surface in one smooth motion. The top colors get pushed into the base, creating feathery, flame-like patterns. Many artists get their largest, most dramatic cells from this method because the friction forces pigments to separate and react.
Tree-Ring / Puddle Pour: Pour individual colors in concentric circles directly onto the canvas, then tilt gently. The result resembles wood grain or marble veining — elegant and relatively controlled. This technique works beautifully with two to three colors; add too many, and everything blends into a single murky shade. It's a favorite for pieces that need to match specific home decor.
That said, technique is only half the battle. The surface must be perfectly level. Even a slight tilt will send half the paint sliding off one edge while the opposite side stays bare. Use a bubble level and adjust with folded paper towels underneath the supports. Temperature matters too — aim for 70-75°F with low humidity so the paint dries at an even rate without cracking.
How do you finish and seal acrylic pour paintings?
Wait at least two to three weeks for the paint to cure fully before applying any sealant. Acrylic pours often feel dry to the touch within 24 hours, but the deeper layers — especially where paint pooled along the edges — remain soft and flexible much longer.
Before sealing, clean the surface with a soft lint-free cloth and a tiny amount of rubbing alcohol to remove any silicone residue. Skipping this step causes fisheyes and spots where resin or varnish refuses to adhere. Some artists wash the piece gently with dish soap and warm water instead — both methods work, though the piece must dry completely afterward.
For a high-gloss, wet-looking finish, ArtResin or ProMarine Supplies Crystal Clear Tabletop Epoxy creates a glassy surface that makes colors appear deeper and more luminous. Mix the resin and hardener in exact 1:1 ratio, then apply in thin, even layers with a silicone spatula or gloved hand. Work in a dust-free environment — pet hair and airborne fibers love fresh resin. For a softer sheen, spray with Krylon Kamar Varnish or brush on Liquitex Soluvar. Matte finishes hide minor imperfections but don't enhance depth the way gloss does.
Display finished pieces away from direct Texas sunlight — even quality acrylics can fade over time if baked under UV rays. If selling or gifting, attach hanging hardware only after the sealant has fully hardened. A sawtooth hanger on the back of a cradled wood panel works better than wire for heavier resin-coated pieces.
Common mistakes beginners make
Using too much paint is the big one. A standard 12x16 inch canvas needs roughly three to four ounces of total mixed paint. More than that, and the sheer weight causes cracking, sagging, or edges that never fully dry. Too little, and bare canvas peeks through the middle like an awkward bald spot.
Another frequent error: tilting too aggressively. Fast movements stretch cells into ugly streaks and blend carefully chosen colors into a single murky brown. Slow, patient tilting preserves distinct shapes and interesting negative space. (Think of it as steering a boat through calm water, not flipping a pancake.)
Many beginners also forget to raise the canvas off the work surface. Paint drips over the edges and glues the artwork to the table — a heartbreaking discovery after hours of work. Use plastic cups, painter's pyramids, or even thumbtacks pushed into the back corners to keep the canvas improved while it dries.
Poor color choices ruin pours too. Mixing too many complementary colors (red and green, orange and blue) almost always creates mud. Stick to analogous colors — blues, teals, and greens, or reds, oranges, and yellows — with one contrasting accent for pop. When in doubt, add white or black to separate competing hues.
Finally, resist the urge to touch wet paint. Dust particles, fingerprints, and cat hair (Austin homes seem to attract all three) can ruin an otherwise perfect pour. Cover drying pieces with a large cardboard box or plastic tote to protect them while they set.
Where can you buy supplies in Austin?
Austin Creative Reuse on Middle Fiskville Road sells donated art supplies at steep discounts — perfect for testing techniques without draining the wallet. Jerry's Artarama on North Lamar stocks Floetrol, Golden paints, and pre-primed canvases in bulk sizes. For same-day emergencies, most Home Depot and Lowe's locations around the city carry basic acrylics, drop cloths, and silicone lubricant.
Acrylic pouring rewards experimentation. No two pieces ever look alike — and that's exactly the point. Grab a few cups, mix some paint, and tilt the canvas. The results might surprise you.
Steps
- 1
Gather Your Pouring Supplies and Prep Your Workspace
- 2
Mix Your Acrylic Paints with Pouring Medium
- 3
Pour, Swirl, and Let Your Masterpiece Dry